



Recently I discussed how you could use Express Scribe to insert timestamps in a document. This is a very useful tool; however, you will probably need to make some small adjustments to the formatting to convert it to your client's preferred style.
Here's is what the unformatted timestamp will look like:
You can make the formatting easy and simple by recording a macro that will reformat it to your client's specs.
The key to this is to start recording with your cursor on a blank line. Click on "Record New Macro," name it, and then select a keyboard shortcut(I used Ctrl+D). The first recorded step should be to key Ctrl+V to paste in the unformatted timestamp. Then while still recording, format the timestamp to your client's instructions. For example, I removed the milliseconds and added brackets. The final step in recording the macro is to place your cursor at the end of the timestamp. This is important because it allows you to just hit enter and continue typing after inserting the timestamp without any additional maneuvering. Click on the "Stop Recording" button, and your macro is ready for use!
Now when I need to insert timestamps in a transcript I can simply key Ctrl+T (copies timestamp from ES) and then Ctrl+D (formats timestamp), and my formatted timestamp will look like this:

Wednesday, August 20, 2008
Using a Macro to Format a Timestamp
Wednesday, July 30, 2008
A Macro for Gonna, Wanna, Sorta, etc.
I'm excited to share another macro with you today. But first, for those of you who may have had trouble with the first macro, which automatically changes your sentence spacing from one space following each sentence to two, I'm trying something new. I've now hosted a Word document with the macro at Google Docs. I think the issue may have been that the macro lost its formatting when pasted into Blogger and Word couldn't recognize the code. Click here for that document.
Also, be sure to revisit the old post for instructions on installing the macros.
This new macro is another one of my favorites. Because my main contract uses verbatim speech, such as gonna, wanna, sorta, 'em and 'cause, I sometimes find that I inadvertently use these words when transcribing files that require proper English in place of this common slang. This macro automatically replaces all of those words with the correct speech with the push of a button. To grab the code for this one, click here.
Once you've installed the macro, you can then choose a keyboard or toolbar shortcut to make activating the macros a simple process.
Wednesday, May 28, 2008
My Favorite Macro!
Due to popular demand, we decided to go ahead and post this macro rather than keeping you in suspense.
To install the macro, simply go to Tools -> Macro -> Macros.

In the dialogue box that pops up, enter a name for your macro in the top box and then hit Create.
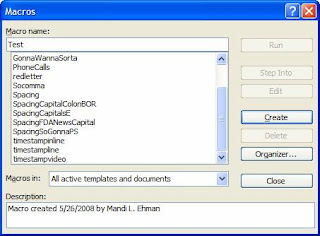
You'll get a visual basic window like this. Leave the first line, "Sub ________," and the last line, "End Sub," but delete the text in between.
View and copy the entire code here and paste it into the macro window.
Simply hit save and close the window. Refer to yesterday's post to assign keyboard and/or toolbar shortcuts for the macro, and you're ready to go!
Tuesday, May 27, 2008
Setting Up Keyboard Shortcuts and Toolbar Buttons for Your Macros
What makes macros especially useful is being able to run them with the press of a few keys or the click of a button. When you record your own macro, assigning these is part of the process. However, when you paste the code in directly, like when sharing macros with other people, which we'll be doing soon as we begin posting some of our favorites, you skip that step. Fortunately, it's easy enough to manually make and change those assignments.
First, go to the Tools menu and click on Customize.
To change the keyboard shortcuts, click on Keyboard... at the bottom of the window.
You'll want to scroll down in the Categories window and click on Macros and then choose the macro you're trying to modify from the list on the right side. Then click in the "Press new shortcut key" box and hit the key combination you'd like to use. If that combination is already in use, the current assignment will show up underneath the box. At that point, you can decide whether to overwrite it or try a different combination, and once you've decided on the one to use, you can click Assign, and the key combination will show up under "Current keys."
To add a button to your toolbar for easy access, click on the Commands tab. Scroll down and click on Macros and you'll see the list of saved macros populate the right side of the window. You can then drag the one you want to use to your toolbar.
To edit the appearance of the button, make sure that the button itself is still highlighted in the toolbar and click Modify Selection. A menu will pop up that allows you to change the name, assign icons, group your buttons, etc.
With just a little bit of effort, macros can save you a lot of time in your daily work. Next week, I'll be posting my favorite macro, which saves me thousands of keystrokes a day.
Monday, April 28, 2008
Recording a Macro
Before we get to sharing some of our favorite macros, I wanted to start with a tutorial on recording a macro.
Although there is more flexbility when using Visual Basic Language to actually write out a macro (much like HTML when blogging), Microsoft Word will actually record your actions as you go and write the language for you, which is obviously much easier and a great way to get started with macros.
So, here we go. First, you'll want to open up the "Record New Macro" dialogue box:
You'll need to name your macro.
You also need to choose whether you want to add a button to the toolbar for this macro or create a keyboard shortcut. The good news is whichever you choose, you can modify those later if you want, and we'll get to that in another post.
If you choose keyboard shortcut (which is the best way to maximize your efficiency if it's a macro you'll be using while transcribing, so that you don't have to lift your fingers from the keys), you'll see this dialogue box.
Simply press the key or combination of keys you wish to use, and you'll see them appear in the second box from the top on the right-hand side. I hit Alt+Ctrl+/ for the purposes of this sample. Below that you'll see "Currently assigned to:". In this case, it shows that the combination I have chosen is unassigned, so I can hit "Assign," and it will move over to the white box on the left side. I can add more combinations if I want, or I can hit close and move onto the next step.
If the key combination is already in use, it will tell you what it's being used for so that you can decided whether to override it or not.

Finally, after you close the window, you'll see the icon appear on your screen that indicates the macro is recording. Now simply go through the steps that you wish to record as part of the macro, whether they be changing formatting, find and replace or any number of things. You can pause and restart the recording as needed, and when you're done, simply hit the stop button, and your macro is ready to go.

Tuesday, April 15, 2008
What Is A Macro?
You may or may not have heard of using macros in Word before, but next to text expanders, macros can be one of the most overlooked productivity tools available to us as transcriptionists, and the best part is there is no additional software to download or cost to incur.
A macro is “an action or a set of actions that you can use to automate tasks.” With the click of a button or a single keystroke, you can have Word perform some of your routine tasks quickly and easily.
Macros are written in Visual Basics for Applications programming language, but thanks to Word’s macro recorder, you can create new macros simply by performing the tasks with the recorder running.
Some examples of useful macros are:
□ Sentence spacing
□ Formatting
□ Automating find and replace
□ Changing the color or style of text
We will be posting examples and detailed instructions for each of these types of macros in the coming weeks.