

So far, we've covered how to connect to an FTP server using Windows Explorer through your browser and by using an FTP client. This week we're going to look at how to set up a permanent link in "My Network Places" that will save all of your information for you and allow you to connect just by clicking on the icon.
First, go to My Network Places>Add a network place (under Network Tasks).
A new window will pop up and prompt you. Click Next to advance.
Select Choose another network location and click Next.
Enter your FTP server address.
Add your user name if you have one.
Select a name for your network place so you remember which FTP server it is. I name mine as the network address usually because the client name is most often in the address. Do something that will be easy for you.
Select Finish and your network place will appear.
Click on it to open the FTP server.
Now you can save your password and your network place will just be a click away whenever you need to retrieve a file.
Wednesday, February 11, 2009
FTP 101 – Creating a Network Place

Wednesday, February 4, 2009
FTP 101 – SmartFTP
As I mentioned a week or two ago, you can use an FTP client to access an FTP server. First, you'll need to download a client. FireFTP is a free client for Mozilla Firefox. SmartFTP and FileZilla are other options. Because I already have SmartFTP on one of my computers, I'll walk you through using that, but most FTP clients work in approximately the same way and should be relatively self-explanatory once you know what you're doing.
Once you have your FTP client downloaded, you can have it look at your computer and the files on your computer.
In SmartFTP you go to File>Look For New Remote Browser.
Enter your FTP server address and your user name and password if you have them.
Now you'll be able to see the files located on the FTP server.
The easiest way to transfer the files is to click on them and drag them to the location of your choice.
Then click the Play button to start the transfer.
And that's it! Your file is transfered.
Wednesday, January 28, 2009
FTP 101 – Windows Explorer
As I mentioned last week, file transfer protocol is one way that a client or company may use to send you work by uploading audio files to a server. To get the file to your computer, you would then access the FTP server and download the file to a selected location. Easy, right?
There are three ways to access an FTP server from your computer. You can access the site through your browser, by setting up a network connection on your computer or by using an FTP client like FileZilla or SmartFTP.
We'll start by accessing an FTP server directly using your browser. You will have to use Internet Explorer to do this, as Firefox and Google Chrome both require you to use a client.
First, open IE and type in the FTP server address. The address should look something like this:
ftp://ftp.name.com
Then hit enter. You should get to a page like this one:
Follow the instructions given and go to Page>Open FTP Site in Windows Explorer.
A new window will open to the FTP site. If there is a user name and password on the site, you would enter that at this time. 
And you're in!
To download a file, drag and drop the file to the location of your choice on your computer.
Monday, September 22, 2008
Getting Started – Configuring Your Pedal with Express Scribe
As Tara mentioned in her post about the basics needed to get started as a general transcriptionist, Express Scribe is our audio player of choice because it's free, but it's also the one we all use, even though we have other software, because of it's functionality as well.
After last week's poll on using a pedal, I thought this would be a good time to talk about setting up your pedal and customizing your setiings. If you're using a pedal, such as the Infinity IN-USB-1 (which is not necessary when you're first practicing but does help with productivity once you get going), you can follow the directions provided on the Express Scribe site to set up your pedal.
There are a few settings you'll want to look at and adjust for your preferences. For example, on the Foot Pedal Control screen (under Settings), there is a check box for "Quick tap on play pedal locks play on." I prefer to push the pedal to play and let go when I want to stop rather than tapping it on and off. However, I am admittedly not the fastest typist, and you may find that it works better for you if you're faster.
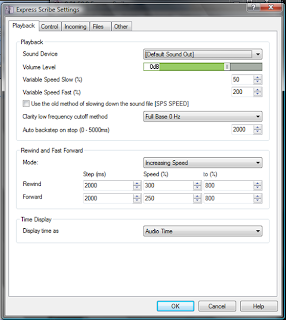
There are a few other settings on the Playback screen (also under Settings) that you'll want to adjust whether you're using a pedal or the hotkeys to control your audio. As you can see below, I've set my "Auto backstep on stop" to 2000ms. This is about 2 seconds, so when I let go of the pedal, the audio steps back approximately 2 seconds for when I'm ready to start playing again. In my opinion, this is the most important of the settings, and so far 2000ms works for all three of us. On the other hand, I haven't been able to find rewind and fast-forward settings that I'm entirely happy with, so I recommend you play around with those until you find what works for you.

Sunday, September 21, 2008
Poll Results – Do You Use a Pedal?

It was great to hear from you all in this week's poll about who uses a pedal. It looks like most of you started out using one and still use one today. The answer I found most interesting was the three of you who started out using one but no longer do. We'd love to hear why you switched to using hotkeys!
If you're still trying to decide whether to purchase a pedal or not and are working regularly as a transcriptionist, we encourage you to make the investment. All three of us used the hotkeys when we started transcribing, and we were all hesitant to invest in a pedal because we felt like we had mastered the hotkeys and it would not be worth the learning curve. However, there is no doubt that using a pedal is an easy skill to pick up and will undoubtedly increase your transcription speed. There are many reputable sellers selling new pedals (the Infinity IN-USB-1 is our pedal of choice) on eBay, which is where I bought my last pedal from.
If you're just getting started, it's okay to just use the hotkeys while you gain experience and make the decision as to whether this is a career you want to pursue. But once you begin working regularly, be sure to make the switch because you'll find that it enables you to work smarter and faster and therefore earn more.

Wednesday, August 20, 2008
Using a Macro to Format a Timestamp
Recently I discussed how you could use Express Scribe to insert timestamps in a document. This is a very useful tool; however, you will probably need to make some small adjustments to the formatting to convert it to your client's preferred style.
Here's is what the unformatted timestamp will look like:
You can make the formatting easy and simple by recording a macro that will reformat it to your client's specs.
The key to this is to start recording with your cursor on a blank line. Click on "Record New Macro," name it, and then select a keyboard shortcut(I used Ctrl+D). The first recorded step should be to key Ctrl+V to paste in the unformatted timestamp. Then while still recording, format the timestamp to your client's instructions. For example, I removed the milliseconds and added brackets. The final step in recording the macro is to place your cursor at the end of the timestamp. This is important because it allows you to just hit enter and continue typing after inserting the timestamp without any additional maneuvering. Click on the "Stop Recording" button, and your macro is ready for use!
Now when I need to insert timestamps in a transcript I can simply key Ctrl+T (copies timestamp from ES) and then Ctrl+D (formats timestamp), and my formatted timestamp will look like this:

Wednesday, August 6, 2008
Timestamping Files with Express Scribe
Sure, you could spend big bucks for a program that is specifically designed for timestamping, but it's probably not necessary for the average transcriptionist. If you just need the basic ability to be able to insert the current audio time of an audio file into a transcript, this can be done very easily with Express Scribe.
You first should start by setting up a shortcut in ES to copy your current audio time. Open ES and go to Settings> Pedal and Hot Keys.
Click on Add, and then you have to hit the combination of keys you want to use to copy the time. I use Ctrl + T, so I hit that combination, but you can selet any combination that works for you personally.
Finally, you have to select what that combination of keys will do within ES, so select Copy Time and then OK to save it.
Now you have a universal hot key that will copy the current audio time from Express Scribe even if you're working in Microsoft Word. When you're ready to insert a time stamp, you'll simply place your cursor where you need it to appear in your transcript, hit Ctrl + T (or whatever shortcut you assign to it), and then Ctrl + V to paste in the timestamp.
It will probably need some formatting depending on the formatting instructions you have from your client, so check back for a short tutorial on how to record a macro that will reformat it when you paste it in!
Tuesday, June 24, 2008
Audacity: Another Option for Your Poor Audio
Last week, Mandi covered the basics of poor audio and what Express Scribe can do for you here. However, Express Scribe can sometimes distort audio just enough depending on the reason it is poor and can actually hinder your ability to hear the words correctly. When I find this to be the case, I turn to Audacity to see if it can't boost my audio without distorting it.
Audacity is a free program that allows you to make several editing changes to your audio file. I have found the Amplify function to be very useful in increasing the volume of a file without distorting the audio or making background noise louder. I have the beta 1.3.5 version downloaded to my computer.
You can load your audio into Audacity by dragging and dropping the file into the window.
Then go to Effects and down to Amplify. Here you can see the full list of effects Audacity offers. I have only played around with a few, but I'd love to learn how to utilize some of the others more effectively.
After opening Amplify you can set the decibel level and test to see if is loud enough. If there is silence at the beginning of your file you won't be able to test and will need to guess to reach the right level. Be sure to check the "Allow Clipping" box and hit OK.
After you've amplified your audio you can export it and then load it into Express Scribe or your other player as usual. The process can take a few minutes to complete, and I usually try to do this while I'm planning on taking a break so my computer works while I rest.

Friday, June 20, 2008
Getting Started – Working with Poor Audio
One of the most frustrating things about transcription is that we as transcriptionists have no control over the quality of audio we receive. I still remember the first ever file I received as a subcontractor, which I could not understand at all and had to send back. Three years later, I still find myself wishing I still had access to that audio so I could see what I could pick up from it now.
Poor audio can be defined many different ways, including:
*Audio that is recorded on a tape recorder in someone's pocket.
*Conversations in a busy restaurant.
*Speaker phone conversations.
*Audio which includes a lot of crosstalk between speakers.
*Group conversations where the recorder is clearly too close to some speakers and too far away from others.
*Recordings with static, music or some other background noise or interference.
*People who eat while they talk.
And the list goes on and on.
For those of you getting started, I'm going to assume for the purposes of this post that you're working with Express Scribe as I describe some tricks of the trade that may help you.
1. Make sure you have good quality headphones/earphones. While you don't necessarily need expensive Bose headphones (which doesn't mean I'm not coveting a pair of those for myself!), it is important that the sound quality be clear, especially when working with poor audio.
2. It may be necessary to find a time and/or place to work with little background noise. While I often work while my children play next to me, some files simply have to wait until they're in bed.
3. In Express Scribe (ES), go to File -> Special Audio Processes. There are three processes listed here: Background Noise Reduction, Extra Volume Boost, High Pass Filter. Frankly, the only one I find to be consistently helpful is the Extra Volume Boost, but it's a good idea for you to try each of them separately to get a feel for what they do. A quick note here is that these processes may take a few minutes to complete, so be patient. There should be a status window that pops up while it's running. Occasionally ES will freeze, in which case you'll need to restart the program and run the process again.
4. Go to Settings -> Playback Settings. Next to Clarity Low Frequency Cut Off, you can choose Full Base 0 Hz, High Base 500 Hz, Low Base 1000 Hz or Sharp 1500 Hz. You'll find that different files will do better on different settings, although I find that Sharp 1500 Hz works the best for me the majority of the time.
5. If you come to a word, phrase or sentence that you can't understand, try listening to it 2 or 3 times. If you still can't understand, continue on with the audio. You may find that the inaudibles can be filled in once you have more context. On some files, you may find that you're able pick up additional inaudibles when listening to the file again once you've transcribed the whole thing.
Finally, please note that sometimes a file will be impossible regardless of what you try. This is especially frustrating when you get a file that seems like it should be understandable but simply isn't. Just remember that even the most experienced transcriptionist can only do so much with what's given to them!
Wednesday, June 11, 2008
Time Coding With Start-Stop PowerPlay
Time coding with PowerPlay is one reason I purchased the software, despite its hefty price tag. I find this feature to be useful in many situations, looking past some annoying drawbacks that I have been assured are being worked on by a customer service representative at HTH Engineering, the company that owns the Start-Stop system. For a brief summary of Start-Stop there is a post here about different video transcription systems and their drawbacks and benefits.
First you want to open your file. (Nothing like the basics.) 
Then we open the Time Stamp Functions menu to decide how we want to time stamp the file we're going to be working on.
There are two types of time stamps that seem to be requested most frequently by clients. Some people want the elapsed time of the video itself or the play time. Others want the video time that is recorded on the video directly and is visible somewhere on the screen. We'll go for the easier one first.
To select to use the elapsed time that shows as a video plays, simply select this option in your Time Stamp Functions menu and you're done.
To offset the time stamp to match the time displayed on the screen we want to select the second function under "TIME*" and enter the starting point of the video at 0:00. Use the time that is visible when the video first opens to find the correct number.
You will more than likely have frame numbers attached to your time stamp, and there is no place to enter those on the Time Stamp Functions screen. Only put the first three sets of numbers into the hours, minutes and seconds drop-down menus.
If you need to also have the frame number included in your time stamp you will need to enter it by hand. In order to get the colon or period that comes before that to be added with the rest of your time stamp just place that in the second box under "Enter time-stamping string here."
To make sure your time stamp will show up as the screen stamp, just press the E.T. button on Start-Stop's main menu once. It will turn red and display as "T.S." That is the time that will be entered into your document when you hit your hotkey.
To set your hotkey, open the Hot Keys under Configure and choose a hotkey that works for you. I actually have my right pedal on my foot pedal set to insert my time stamp at the moment; however, it could be any number of keys. Just make sure you choose something that doesn't interfere with any other macros or hotkeys you have set up.
And that's it. As I said before, the kind customer service rep at Start-Stop assured me that they were looking for a way to incorporate adding the frame number with the rest of the time-stamp string as well; however, it's not yet available. Still, from 11 keystrokes down to 2 isn't bad. I'll take it.
Wednesday, April 23, 2008
An Introduction to Video Transcription Players
Video transcription, much like transcription itself, can mean many different things. Depending on the subject and content matter of video transcription, you could be doing anything from simply transcribing something that happens to be video rather than audio-only all the way to a combined continuity/dialogue and spotting list for major motion picture or television show. We will go into the different kinds of video transcription and what they entail in future posts.
Before you start video transcription of any sort, you are going to need a transcription program able to play video. Three popular choices are: TheRecord Player, Inqscribe and Start Stop PowerPlay. Each player will play video and incorporate the use of a foot pedal; however, the features are different for all of them.
TheRecord Player is a free player that can be downloaded from For the Record. You are able to use the video software with a foot pedal, and it will work nicely if timestamping video is something you don't do much of. One drawback of TheRecord Player is the inability to timestamp with hot keys, as the other two players below can.
Inqscribe has many features that can be useful at times, including the ability to timestamp directly the transcript using a hot key of your choice. It also allows you to set the start time to match the video runtime that is displayed on the screen, and you can also choose the format for the timestamp. One drawback is that you have to type directly into the Inqscribe screen and cannot type into another program such as Word, Word Perfect or Excel. Inqscribe is available as a single-user license for $99.00 that allows you to install the program on two personal computers. Additionally, discounts are available for academic personnel and students.
Start Stop PowerPlay is the most expensive of all three video transcription players at $175.00. Included in the price are several features that the above two players do not have. Not only can you timestamp directly from the video runtime, but you can also timestamp directly into your word processor. You can set PowerPlay to enter timestamps into the document at certain intervals without you having to do anything, and you have the option of adding video thumbnails to be pasted into our document as well. Included in the price of the product are free upgrades of the software for life. This can be very valuable in video transcription and increase your productivity.
Obviously, your personal needs as a transcriptionist are what is going to be the deciding factor in determining which player is right for you. Hopefully, you have found this information helpful as you look for the player to suit your needs.


